Guest
View
This page describes how to the use the Guest view for
www.KidsBirthdayList.com and www.KidsChristmasList.com.
The page is accessed through a link provided by the child's parents.
When you access this link you will go directly to the main
gift list page.

This page has 4 main areas which are:
- Child
information area
- Navigation area
- List management
area
- Gift list
Child
Information Area
The Child information area contains information about the child
depending on which site you are currently using. For
KidsChristmasList.com it displays the child's name and the number of
days until Christmas. For KidsBirthDayList.com it displays
the child's name and their birthday.

Navigation Area
The Navigation area allows you to navigate between the pages showing
the gifts. Each page holds up to 10 gifts. If there
are more than 10 gifts then the <> controls will become
active so that you can navigate between the pages. The
< and > controls are shown in either blue or grey.
They are only active when they are shown in blue, and will
only be
shown in blue when they can be selected. For
example the > control will only be active if you are on the first page when there are more
than 10 giftts.

List
Management Area
The List management area allows you to work with the gift list.
It includes a number of controls of which only a subset will
be available in the guest view. Those available will include:
- + - used to add a new gift to the list
- $ - indicate that you have bought a gift
 - allows you to
print a shopping list
- allows you to
print a shopping list

The + control can be selected at any time and it opens the gift entry
area. As a
guest you should only add gifts that you have already bought. The
child will not be able to see these gifts and all other guests and the
parents will see these gifts as having already been bought.
The Navigation area allows you to navigate between the pages showing
the gifts. Each page holds up to 10 gifts. If there
are more than 10 gifts then the <> controls will become
active so that you can navigate between the pages. The
< and > controls are shown in either blue or grey.
They are only active when they are shown in blue, and will
only be
shown in blue when they can be selected. For
example the > control will only be active if you are on the first page when there are more
than 10 giftts. 
This area is used to enter information for a new gift. Only
the
Name field is mandatory, however, it is recomended that you provide as
much information as possible including the make (manufacturer) of the
gift, a good description and if possible a link to a page providing
more information or a page from which the gift can be
purchased. Once the
information
has been entered select the "Add" button to add the gift or the "Close"
button to close the gift entry area without adding the gift.
The checkmark control can be used to indicate you have bought a gift.
It only becomes active (displayed in blue) once you have
selected
one of the gifts from the list.
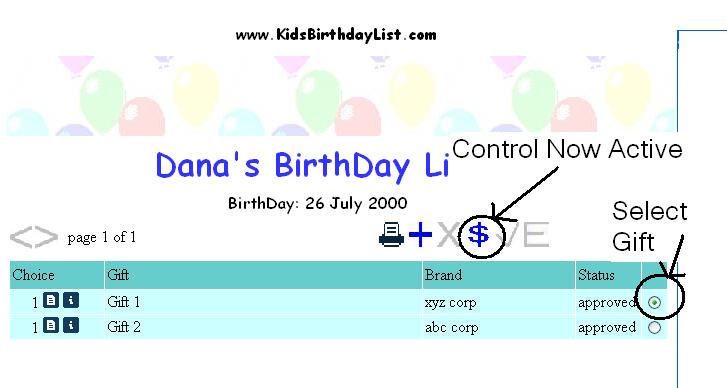
Once you have selected the gift and select the checkmark control you
will be
asked to confirm that you have purchased the gift.

Select "Ok" to confirm you have purchased the gift or "Close" to close
the purchased
confirmation area without marking the gift as purchased.
The printer control allows you to generate and print a shopping list
for the
child. Only gifts which have not yet been bought will appear
on the list. The information for each gift will include the
gift
preference, gift name, brand, and description (if one was entered).
For example:

Gift
List Area
The Gift list area provides information about the existing gifts and
which gifts the child would most like to receive.
Each line in the list provides information for one gift
including
the Gift Name, Brand/Manufacturer, description, link and the status of
the gift . The Gift Name, Brand and Status are in the columns
titled "Gift", "Brand" and "Status" respectively.
The status will show as either:
- approved - this indicates that the child's parents have
approved this gift
- bought - the gift has already been bought
The description and link for the gift are accessed through the icons
under the Choice column.

If you select the link icon (looks like a piece of paper) a new window
will open with the link that was provided for the gift. If
you
move the mouse over the description icon (the one with the i) the
description will appear for as long as the mouse is over that icon:

The number in the choice column shows how much the child wants the
particular gift. Those most wanted have a 1 while those lower
down on the list have a lower number in the range of 2-5.